OBJECTIVE:
To install a new Tanoga Short Shifter into a 2003 Audi A6, 27T, without the
typical "screw-on-off" type shift knob (A6 model years late 2002+).
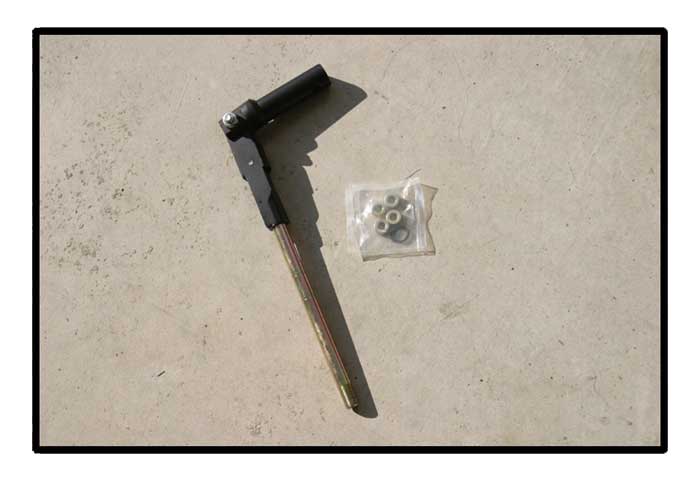
INGREDIENTS: Tanoga short shifter, 4 spacers, 1 circlip
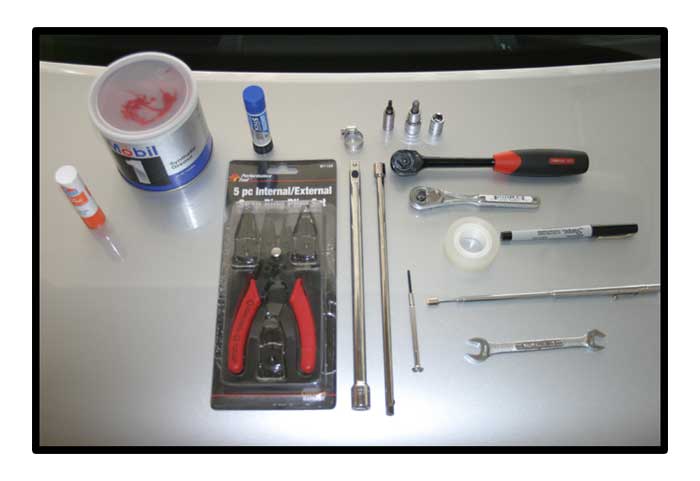
REQUIRED TOOLS: While you can surely use a different toolset, I used a small
flathead screwdriver, 1/4" and 3/8" ratchets, 10" extensions
for both ratchets, 1/4" torx 20 socket, 1/4" 10mm socket, 3/8"
6mm hex socket, 10mm open wrench, "circlip pliers" (aka "snap
ring pliers" or "ring spanners")loctite (blue), small-ass clamp
(not to be mistaken with small ass-clamp), grease, elmer's glue, magnetic wand,
sharpie pen, scotch tape, dress-shirt collar inserts.
PROJECT DIFFICULTY AND INSTALLATION TIME: Easy; 1-2 hours.
PRECAUTIONARY
NOTE: The instructions that come with the Tanoga short shifter from AWE are
not 100% correct. They instruct the user to unscrew the shift knob. On late
2002+ A6's, the shift knob DOES NOT unscrew. I called AWE and they said I'd
have to buy an S4 shift knob, or return the shifter with 15% restock fee. Whatever.
In fact, this WILL work with stock shift knob, but the installation process
is a little different. Rest assured, the installation remains as easy as it
could be and follow below.
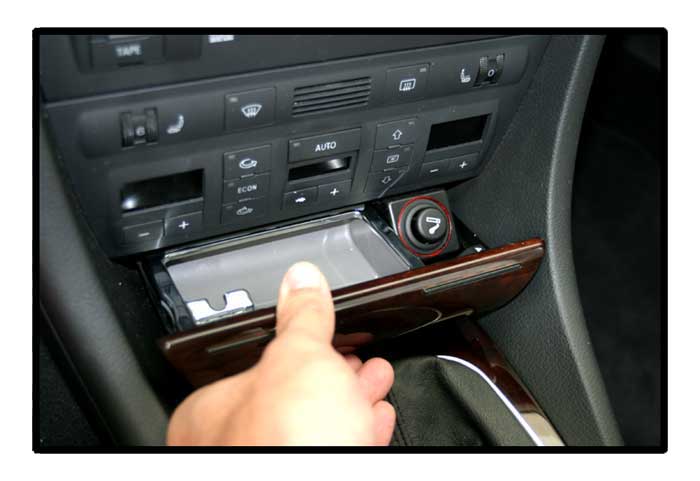
STEP 1 - GET SITUATED AND REMOVE FASCIA FROM ASH TRAY: Open nice nut brown Newcastle.
Oh yeah. Adjust drivers seat all the way back, and open your ash tray (you will
want to remove the fascia from the ash tray to keep it from exploding off when
you detatch the shiftbox cover).
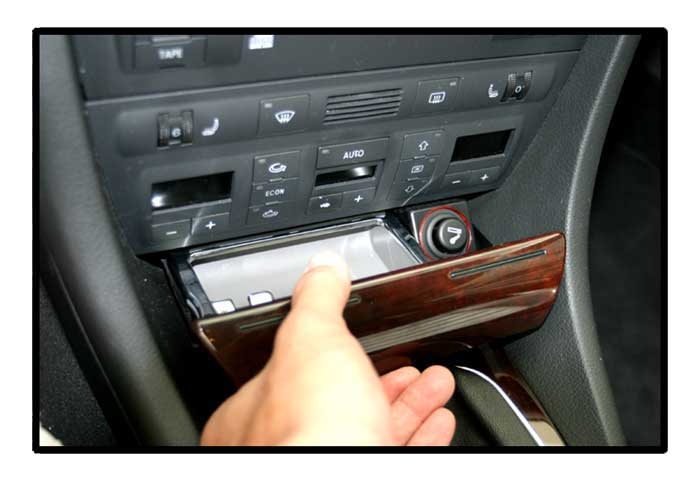
Remove the fascia by slipping your fingers underneath the tray, thumb on top,
and pulling gently up and rearward with a scooping motion. Two hooks will snap
free from the bottom of the ash tray and the fascia will pop off into your hand.
Once the fascia is removed, set it aside and close the ash tray once more.
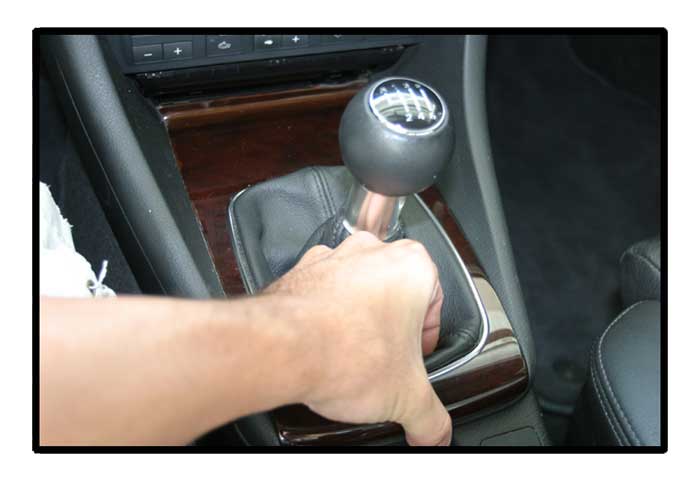
STEP 2 - DETATCH
THE SHIFT BOX COVER: Grip the shift box cover by placing your fingers into the
shift boot pocket and cupping them underneath the shelf of the shift box cover.
Grip the outside rear edge of the cover - where it turns downward at its end
- with your thumb.
With a good grip and steady pressure, pull the rearward end of the cover up-and-out
of the set of clips that binds it down. It will come up easily, so there is
no need to apply fully-blown he-man type strength.
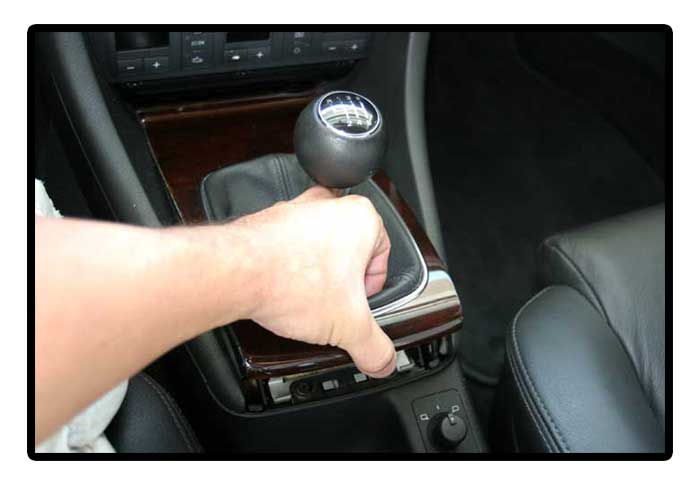
Once the rear section comes loose, continue to pull up and rearward to detatch
the forward portion and slide it out from under the ash tray.
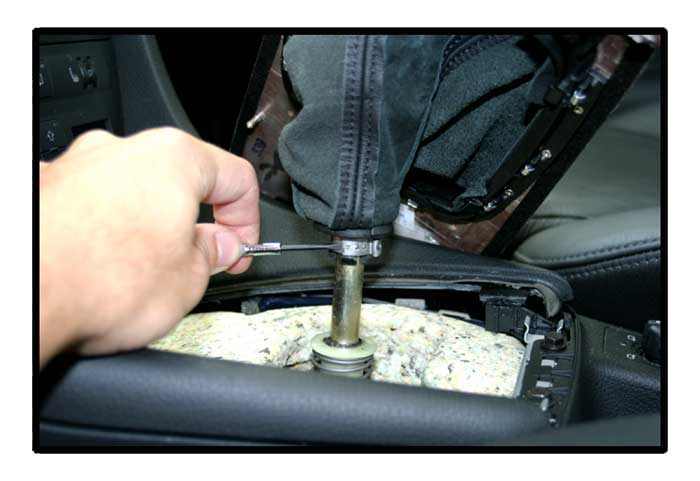
STEP 3 - LOOSEN
CLAMP AND DETATCH SHIFT BOOT AND KNOB: Once you have detatched the shiftbox
cover, turn the shift boot inside out (by pulling up on the detatched shiftbox
cover) to reveal a thick layer of whitish-yellow foam around the base of the
shifter, and the small clamp that holds the knob to the shift rod.
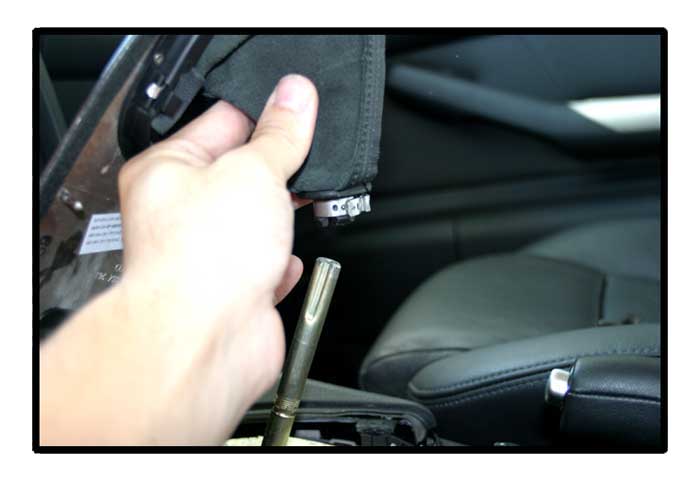
Using a small flathead screwdriver, snap the claimp loose. After the clam has
been snapped loose, simply lift up on the knob and boot and they will slide
right off the shift rod.
This is the portion of the installation that differs from the supplied instructions.
YOU CANNOT SIMPLY UNSCREW THE SHIFT KNOB on the later model A6's. You will need
to get to this clamp and loosen it to continue the install.
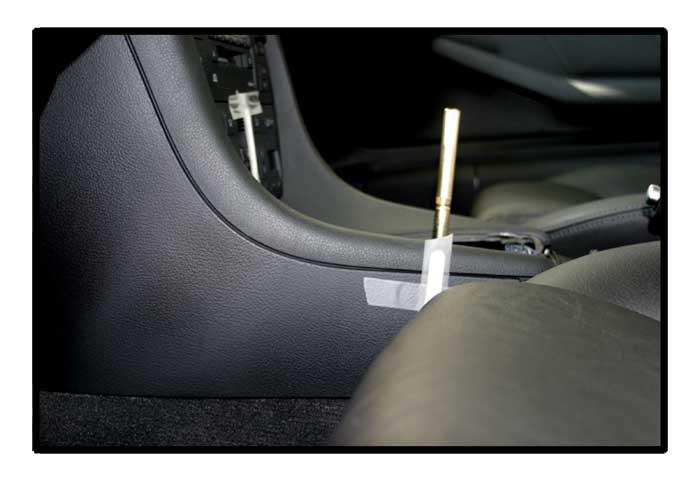
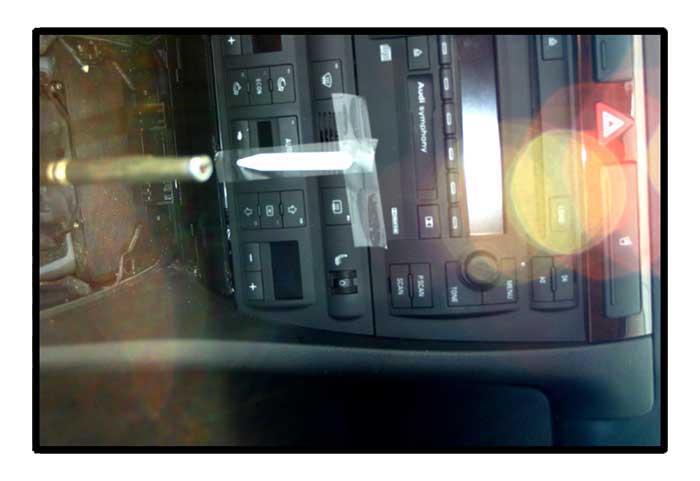
STEP 4 - MARK
ORIGINAL RAKE AND TILT OF STOCK SHIFTER: This step is not required, but at this
point, I marked the rake and tilt of the stock shifter to help me with the placement
and final adjustment of the Tanoga.
I used two collar inserts from a button down shirt of mine, and some scotch
tape to mark the slant of the shifter, both rearward and to the right. Again,
while this is not "required," I did find this a good help when adjusting
the Tanoga, and doing something like this might save you some time as well.
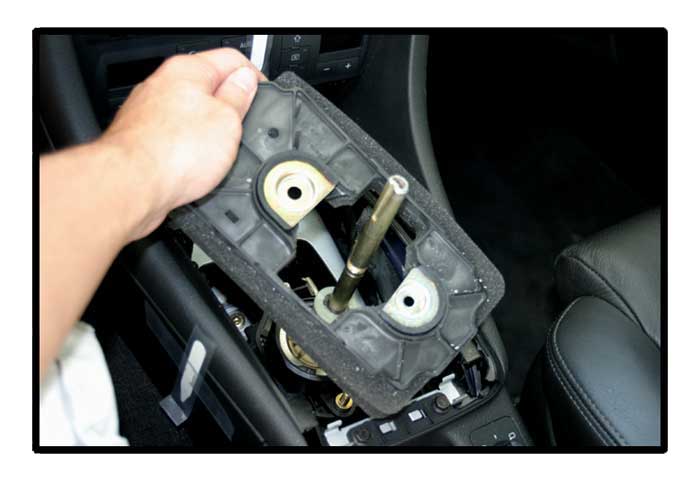
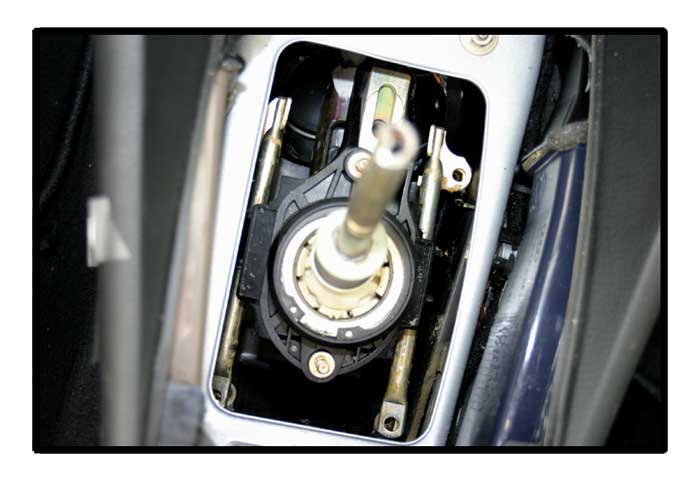
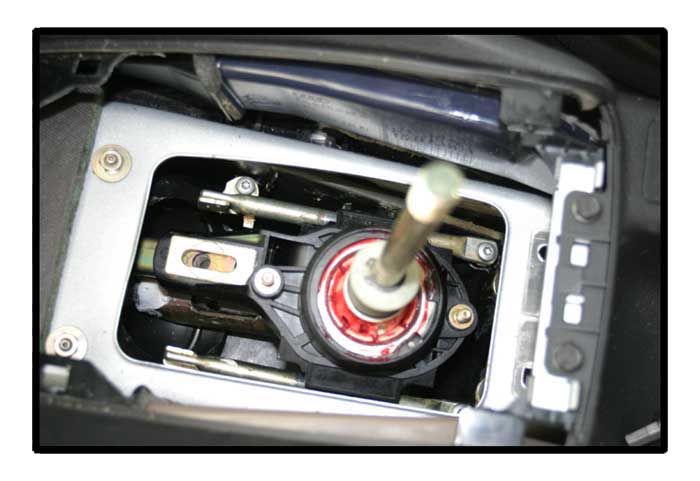
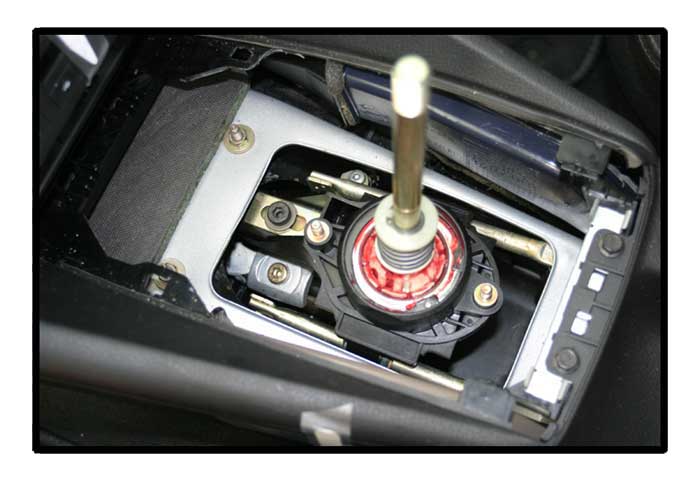
STEP 5 - REMOVE
SOUND BARRIER TO REVEAL SHIFTER ASSEMBLY: Back to the shifter - once you remove
the shiftbox cover, remove the thick layer of whitish-yellow foam.
Removing the foam will expose the base layer of the sound barrier that covers
the shifter assembly. Identify and remove the two 10mm nuts found just forward
and rearward of the shift rod.
To remove the nuts, I used my 1/4" ratchet with a 10" extension and
a 10mm socket. Both nuts were a bit stiff, with the rearward being a bit more
difficult to break loose. Nevertheless, both came off pretty easily.
Once you've removed both nuts, grab the front side of the sound barrier and
lift it up and away to reveal the shiftbox.
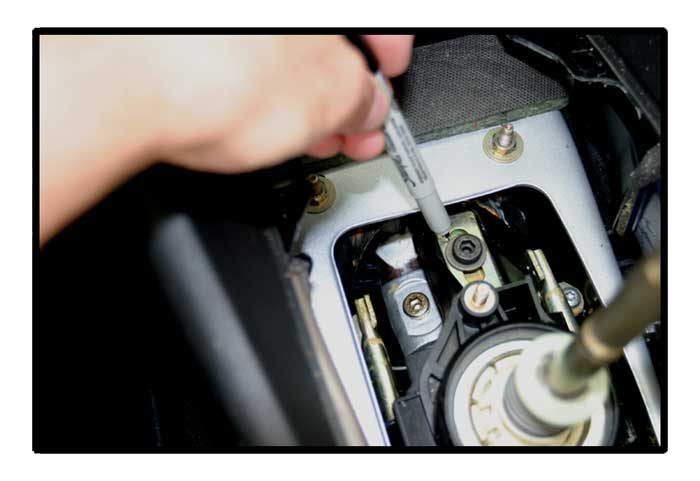
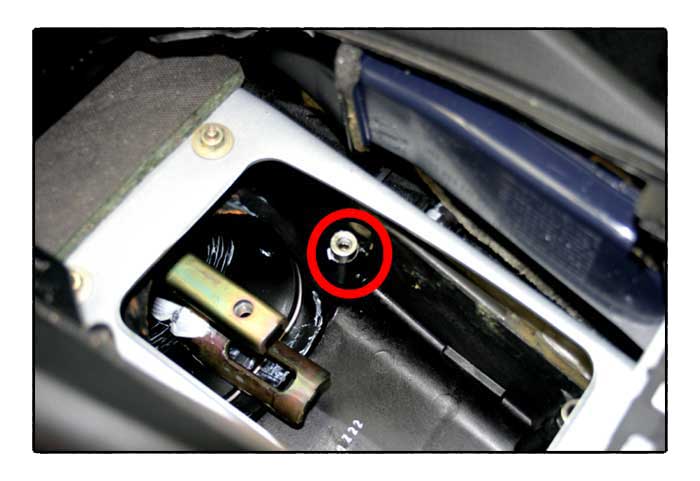
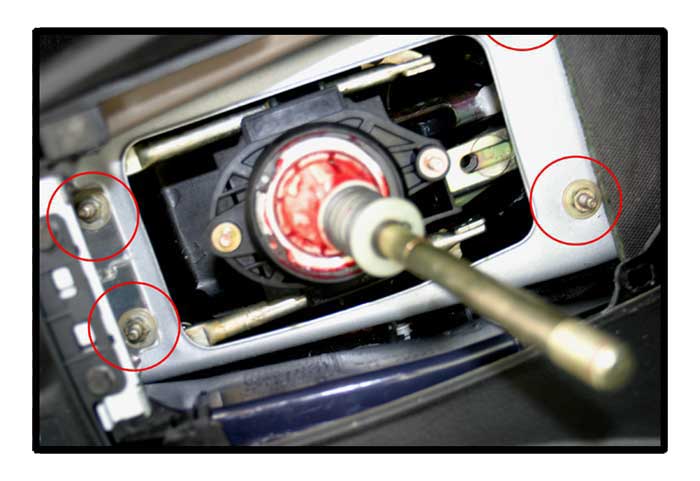
STEP 6 - MARK
ORIGINAL POSITIONS BEFORE LOOSENING HEX BOLTS: While marking the original positions
of the hex bolts isn't exactly necessary, it was definitely helpful to me when
getting the Tanoga positioned correctly.
Apparently, there needs to be a c.43mm space (or something like that) forward
of the shifter, and marking the top hex bolt's position ensures that you will
be able to get the new shifter positioned in the right place. I just used a
sharpie to draw a trace around the top bolt's circular washer and the lower
bolt's rectangular washer.
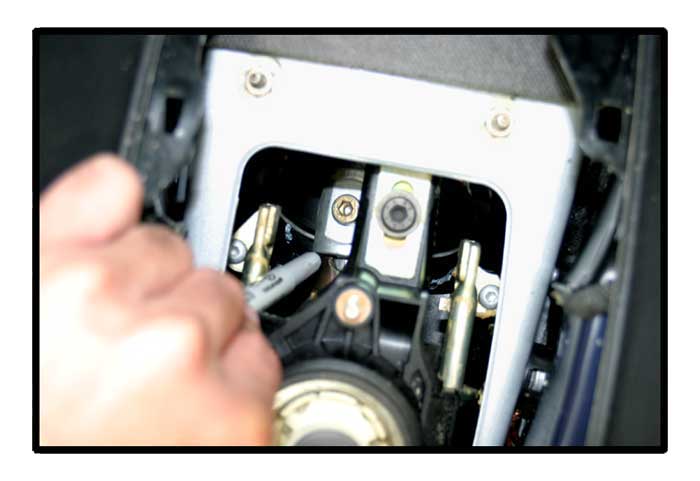
After marking positions, you must loosen (NOT REMOVE!) both hex bolts. To do
this, I used a 6mm hex socket on my 3/8" ratchet with 10" extension.
The tanoga instructions call for loosening each by 1 turn, so I made 4 quarter
turns on each bolt with my ratchet.
The instructions also indicate that these hex bolts might be difficult to break
loose, but in my case, they were easier to loosen than were the soundproofing
barrier's 10mm nuts
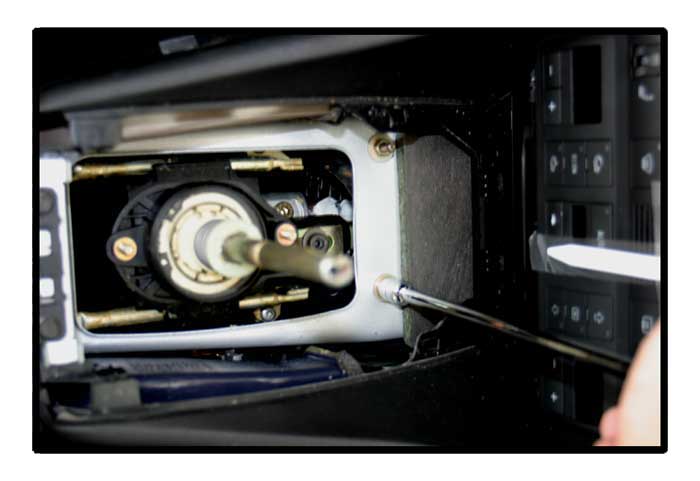
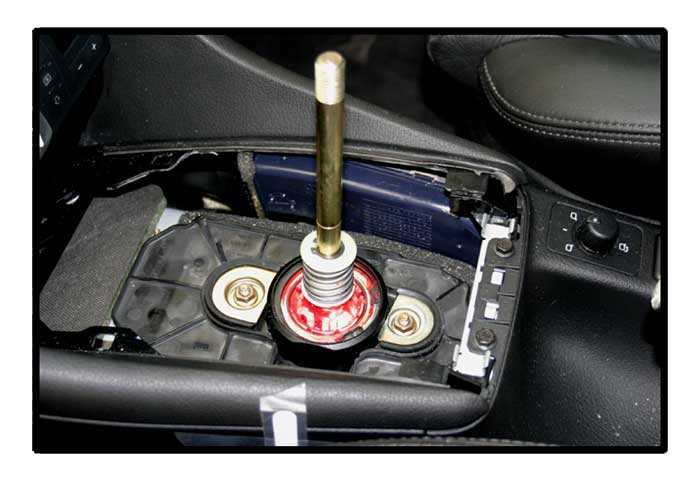
STEP 7 - LOOSEN
/ REMOVE FRONT / REAR 10MM NUTS TO ACCESS TORX SCREWS: Loosen (BUT DO NOT REMOVE
COMPLETELY!) the two 10mm buts forward of the shifter mechanism. I used a 10mm
socket on my 1/4" rathcet with extension, and loosed the nuts until there
were only about three threadlines visible above the top of the nut.
Next, completely remove the pair of 10mm nuts rearward of the shifter assembly.
Doing this is a bit more difficult that loosening the forward nuts, because
the rearward nuts are located underneatha bit of an overhang, and are therefore
a little more difficult to access. a 10mm wrench with a flexible head would
have been perfect here, but I managed fine with a standard 10mm wrench and 1/4"
ratchet without extension.
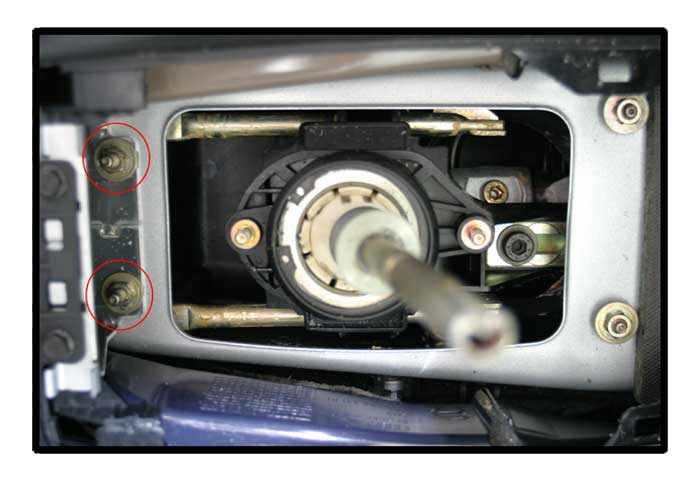
As you remove the two rearward nuts, the shiftbox may drop down a bit. This
is fine, and is indeed necessary. The two front nuts will keep it from dropping
out all the way. If the shift box does not drop down on its own (it may stick
due to grease, as it did in my case), give it a little nudge so that it drops
down, exposing the rearward torx screws you'll need to access in the next step.
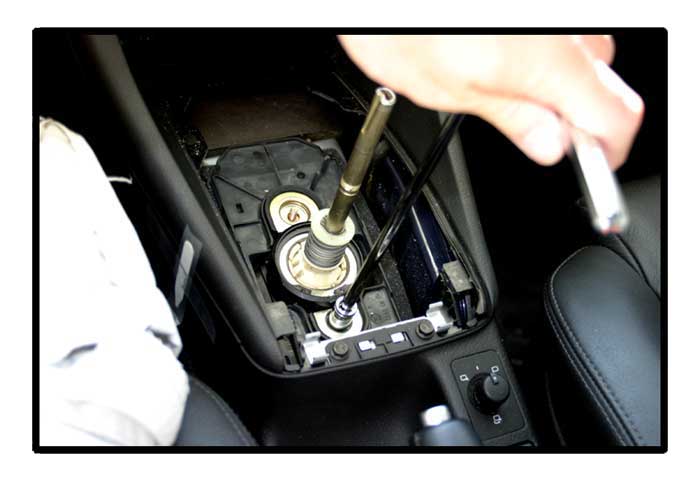
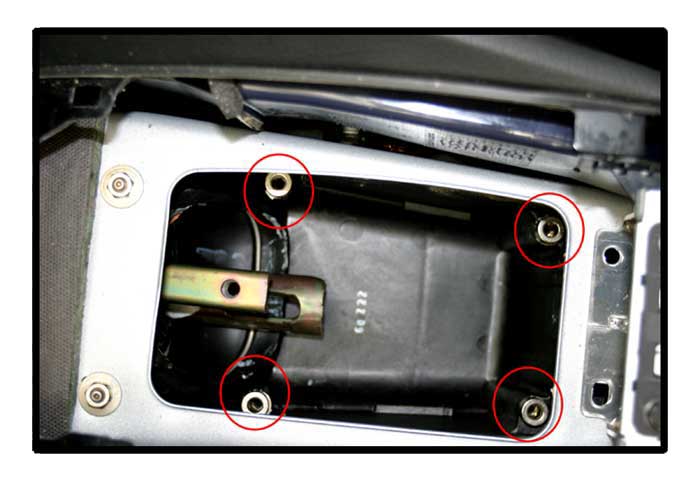
STEP 8 - REMOVE
TORX SCREWS, HEX BOLTS, AND SHIFTER ASSEMBLY: After the shiftbox drops down,
you need to remove all four torx screws (two forward and two rearward of the
shifter. To do this, I used a torx 20 socket on my 3/8" ratchet with a
10" extension. I also used my magnetic wand here to "grab" the
screws as they became fully loose, so I wouldn't loose then into the abyss.
After removing all 4 torx screws, completely remove the two hex bolts you loosened
in step 6. Again, the magnetic wand came in handy with this, especially to grab
the rectangular washer fron the lower hex bolt, which will certainly fall to
the bottom of the shift box (or somewhere else!) once the bolt is removed.
Once all screws and bolts are removed, lift the entire shifter mechanism from
the shiftbox. This is pretty easy if you shimmy it the left and then lift it
out one side at a time. It's really intuitive and won't be a problem.
STEP 9 - MOUNT
SPACERS IN SHIFTBOX: After removing the shifter assumbly, I prepared the shiftbox
for the new shifter by mouting the spacers provided by Tanoga.
Take your spacers one at a time, and apply some glue to the bottom of them.
I used some Elmer's glue (a glue stick, actually) and just dabbed a small amount
on one side of each spacer.
Next, secure each sapcer to the mount points for the 4 torx screws you removed
in the previous step. Make sure that you align them for clear passage of the
torx screws when you reinstall the shifter mechanism with the new Tanoga shift
rod.
I performed this step at this time because I wanted to be sure to give the glue
enough time to dry before trying to reinstall the shifter mechanism. Also, I
used Elmer's glue here because it would work for the application and yet is
non-permanent and, well, cheap.
STEP 10 -
CIRCLIPS AND CIRCLIP PLIERS - A PRIMER: At this point, the instructions call
for the use of "circlip pliers." If you are like me, you may not know
circlip pliers if they took a dump on your face. So here's a short introduction.
A "circlip" is that little horseshoe looking thing that came with
the spacers and your shifter. I believe it's also called a "snap ring."
"Circlip pliers" are used to both contract (tighten) and expand (loosen)
circlips. In my area (Southern California), no one seemed to know what "circlip
pliers" were. Most people around here, apparently, know them as "ring
spanners" or "snap ring pliers." I got a set from a local auto
parts store for about $6.00 (you can see this set in the picture of the tools
used during this install on the intro page. The set was calleed a "5 pc
Internal/External Snap Ring Plier Set" and came with various modular heads).
For this install, I fitted the 90-degree head so that the pliers are closed
when uncompressed, and open when fully compressed. The hardest part of using
these things, for me, was figuring out what they were and obtaining them. Once
I knew that "snap ring pliers" were the same as "circlip pliers,"
obtainment and use were totally easy and intuitive.
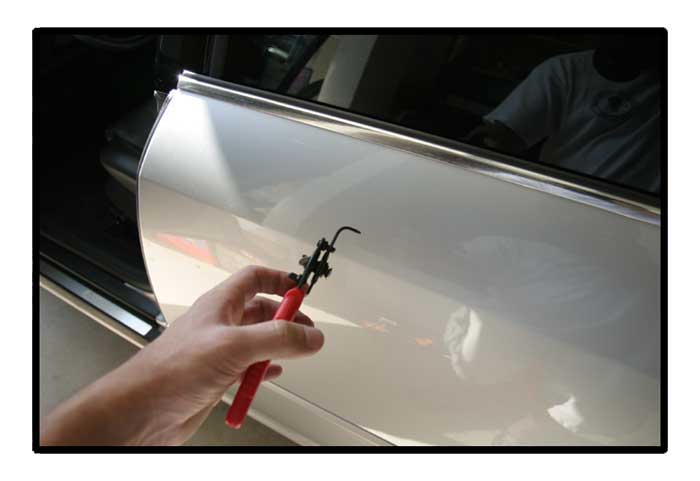
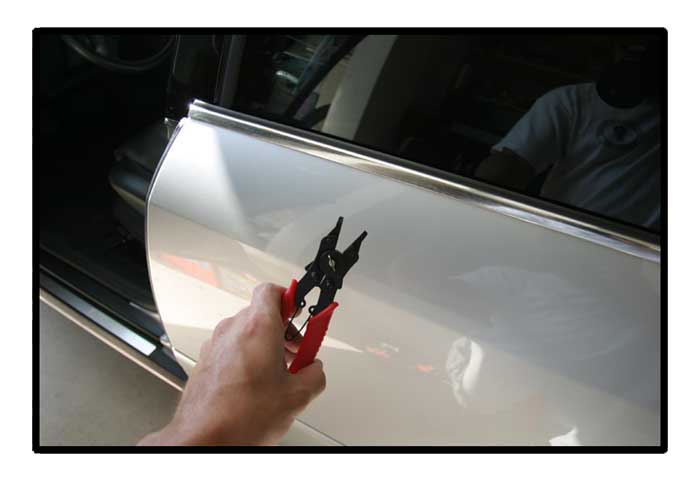
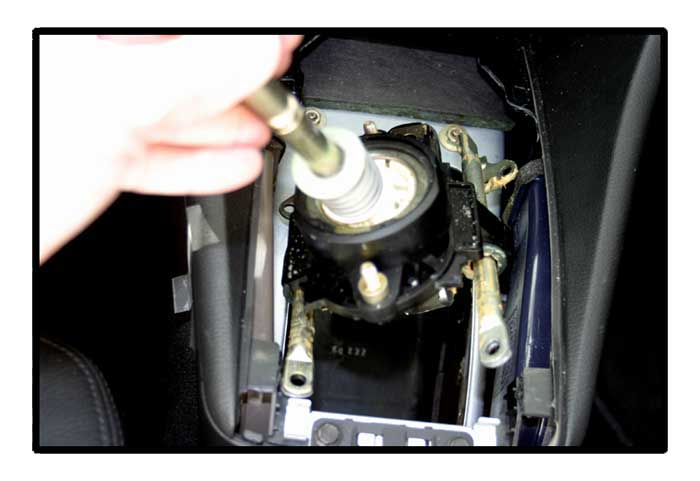
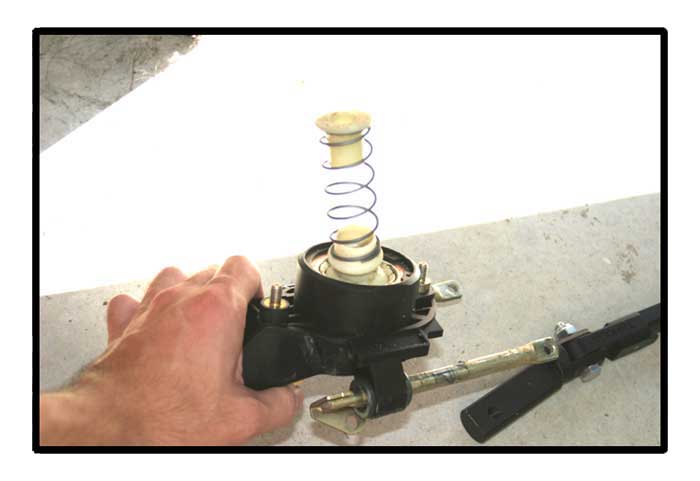
STEP 11 -
REMOVE STOCK CIRCLIP: Use your circlip pliers to expand the small circlip located
above the spring-loaded plastic collar at the base of the shift rod. The nipples
of the pliers will fit into holes in the circlip, and you will need to squeeze
the pliers to expland the clip. Once the clip is expanded sufficiently, you
will be able to lift if up the shift rod and remove it.
You may want to keep some pressure on the spring-loaded plastic collar as you
are removing the circlip, since once the circlip is removed, the spring and
collar will return to their uncompressed state.
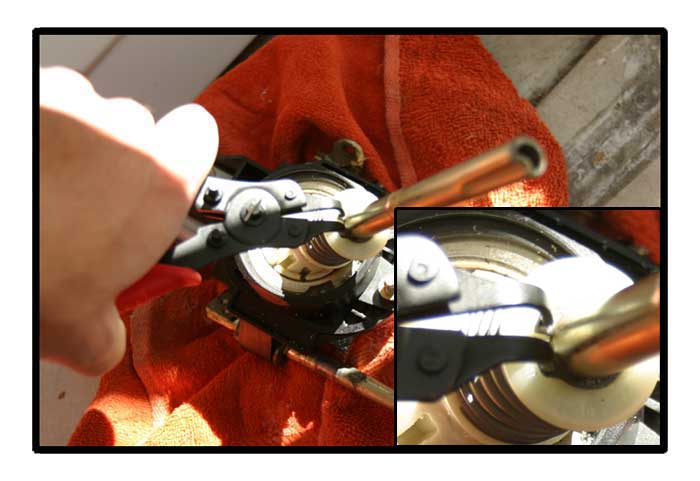
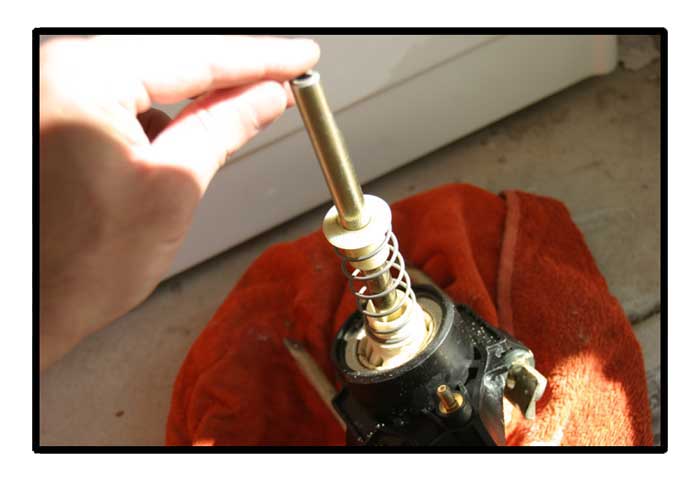
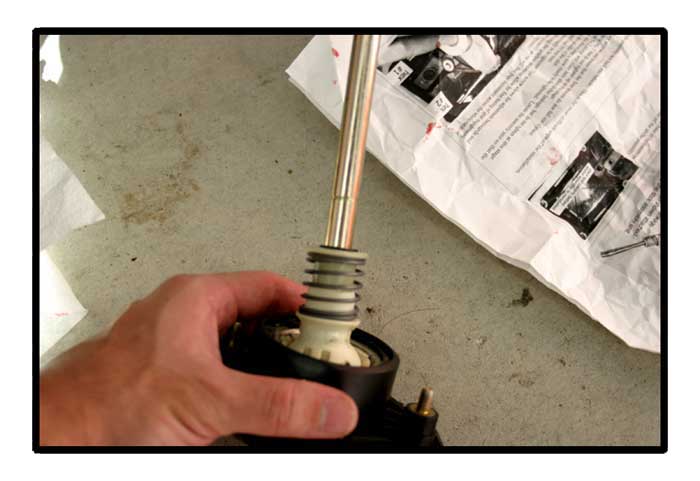
STEP 12 -
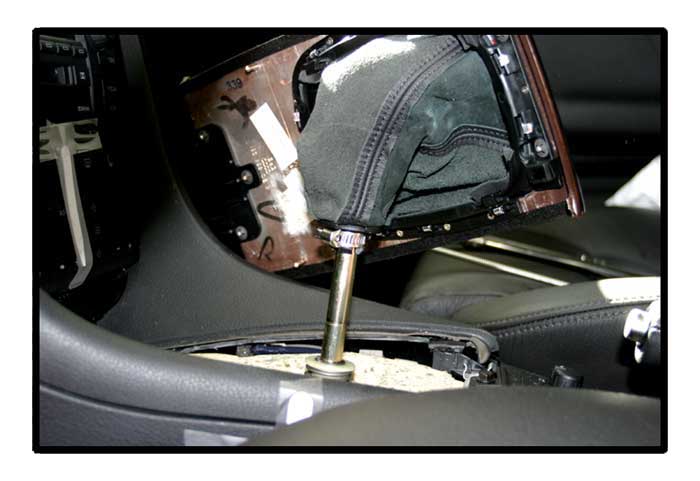
REPLACE STOCK SHIFT ROD WITH TANOGA SHIFTER: After the circlip is removed from
the stock shifter, the shift rod can be removed by sliding it out the bottom
of the shift mechanism.
Grease the Tanoga shifter and the plastic globe of the shifter mechanism (I
used some Mobil 1 synthetic grease that I use on my bypass valves), and insert
it into the shift mechanism from the bottom. Be sure that the new shifter is
installed properly, by confirming that the lower portion of the shift rod (the
part that hangs off the pivot) can point FORWARD with the bevelled side UP /
flat side DOWN).
Once you're sure you've got it in right, use the new circlip that came with
the Tanoga shifter, and, with the spring compressed, close it around the lower
groove on the shift lever with your circlip pliers. You will have to expand
the circlip a bit to get it to slide down the new shift rod before closing /
compressing it in the lower groove.
While this sounds a bit wordy here, it's very intuitive (albeit a tad awkward
using the pliers while keeping the spring compressed).
STEP 13 -
RETURN SHIFTER ASSEMBLY TO SHIFTBOX: Shimmy the shifter mechanism back into
the shiftbox (reversing the motions you used to get it out earlier) and seat
it so that the holes for the torx screws line up with the spacers you glued
into place. While this is not "hard," it's not the easiest thing in
the world either. If you've not secured the spacers with some kind of adhesive,
forget about getting this shift mechanism in place efficiently. I would not
even want to imagine doing this without previusly securing those spacers with
the glue.
After reseating the shifter mechanism (making sure that the bottom portion of
the shifter is pointing forward, with bevelled side up), reinstall and tighten
the 4 torx screws.
Lift the shiftbox up and tighten the two rearward 10mm nuts you removed in step
7. Next, tighten up the two forward 10mm nuts loosened in step 7.
STEP 14 -
ALIGN SHIFTER WITH MARKINGS AND TIGHTEN HEX BOLTS: Once the shifter assembly
is secured, align the tilt and rake of shift rod with the markings you made
in step 4.
Once the angles look close enough, apply some loctite to the upper hex bolt,
slide it through the circular washer and tighten it down. If you marked the
original position of the bolt with a sharpie in step 6, adjust the forward /
rearward position of the shift mechanism until the bolt and washer match the
markings.
Once the upper hex bolt is tightened, apply some loctite to the lower hex bolt,
slide it through the rectangular washer and tighten it, not all the way, but
allowing for a decent amount of play. Getting this bottom hex bolt back into
place was the hardest part of the installation since there's not much room to
work with. I was able to manage it fine, though, by holding the rectangular
washer in place with my fingers and lowering the hex bolt into place with my
magnetic wand.
Again, while you should tighten the upper hex bolt down, leave the lower one
a bit loose. You will need to make adjustments to the shifter position and the
lower hex bolt is the key.

STEP 15 -
ADJUST POSITION OF SHIFTER MECHANISM FOR PROPER AND SMOOTH OPERATION: At this
point, you will need to adjust the shifter so it is positioned properly in the
shiftbox. With the lower hex bolt a little loose, manipulate the shift rod so
that when in neutral, it has equal play both right and left, as well a forward
and rearward when engaging gears. From neutral, you should be able to push directly
forward to get into third, and pull directly back to get into fourth. You should
likewise find all shifts into odd gears a straight forward motion, all shifts
into even gears a straight rearward motion. THERE SHOULD BE NO "LEFT ALL
THE WAY, THEN RIGHT A LITTLE, THEN FORWARD " TYPE BUSINESS TO GET INTO
ANY GEAR.
This step will require bit of patience, but it is the most important step towards
a shifiter that is properly installed instead of almost-properly installed.
Once you feel that you've got it lined up correctly (the markings you made in
step 6 will definitetely help you accomplish this), tighten up the lower hex
bolt and try a dry run through the gears. If you're not going straight into
gears, and if you've got assymmetrical play anywhere, keep adjusting - you'll
be glad you did.
When you feel like you've got it in place, make sure the lower hex bolt is tightened
down and go for a test drive. I used a wadded-up paper towell as a make-shift
shift knob. Come back, make final adjustments and take additional test drives
until you are sure the shifter is positioned correctly.
STEP 16 -
REPLACE SOUNDPROOFING: Once your shifter is properly adjusted, start putting
things back together.
Make sure all the shifter assembly's botls, nuts, and screws are tightened down.
When you're satisfied that they are, replace the lower shoundproofing barrier
and tightening down the two 10mm nuts you removed in step 5.
Next, replace the thick piece of whitish-yellow foam.
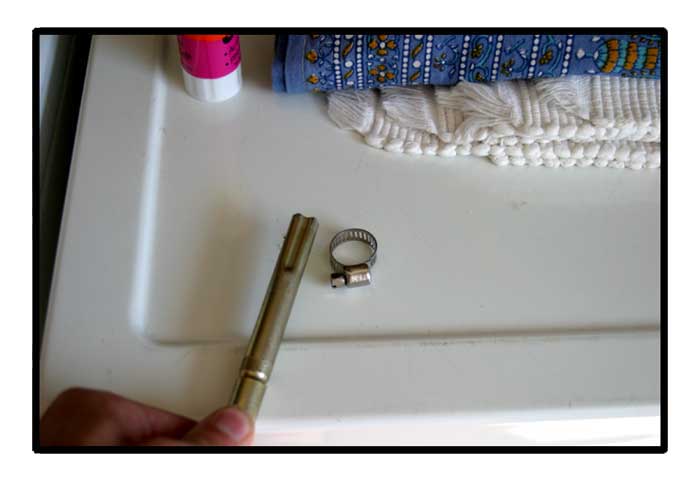
STEP 17 -
PREPARE SHIFT BOOTWITH NEW CLAMP: Get your small clamp (I used a clamp from
Home Depot - the smallest one they sold) and your shift boot - turned inside-out
- together.
Take the clamp and situate it around the base of the plastic collar that sits
around the shift lever.
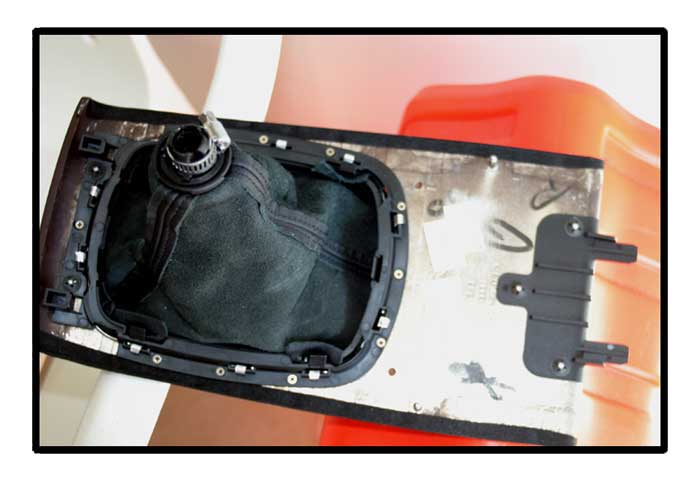
STEP 18 -
SECURE SHIFT BOOT AND KNOB TO SHIFTER: Once you've got your new clamp in place
on the interior collar of the shift boot, slide the inside-out boot back onto
the shift rod, and push down on until the shift knob bottoms out on the shift
rod.
Using a screwdriver or a small socket, tighten the clamp you placed around the
shift boot's plastic collar, to secure it tightly around the shift rod.
Once the clamp is nice and tight, reseat the shiftbox cover by sliding the forward
end underneath the ash tray and pushing down on the front and rear end so they
snap into place.

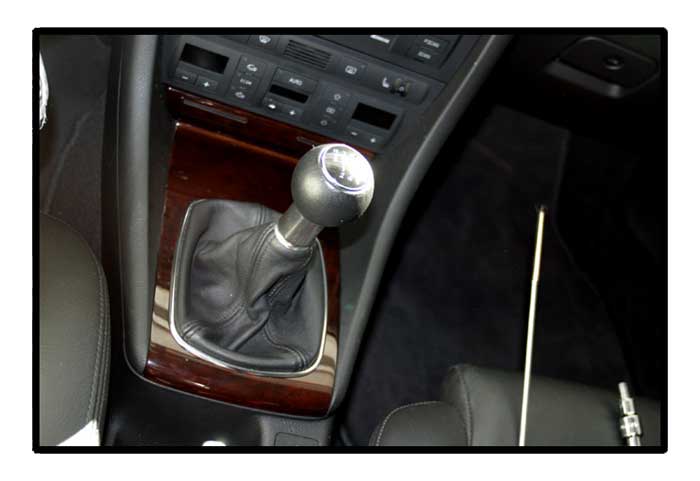
STEP 19 -
REATTACH ASH-TRAY FASCIA AND ADMIRE FINISHED JOB: Once the shiftbox cover is
seated back in place, open your ash tray and reseat the ash tray's fascia. Do
this by clicking the two hooks on the fascia in place on the underside of the
ash tray, then snap the top in place over the front of the ash tray.
You're done! Have fun with the much reduced forward / rearward throws!!

Thanks
to those - and their posts - who made this job easier for me:
bl97: http://forums.audiworld.com/s4/msgs/486167.phtml
funkadelic: http://forums.audiworld.com/s4/msgs/479810.phtml
funkadelic: http://forums.audiworld.com/s4/msgs/659683.phtml
gosteen: http://forums.audiworld.com/a4gen2/msgs/1980.phtml
gosteen: http://forums.audiworld.com/a4gen2/msgs/2384.phtml
diesel geek: http://www.dieselgeek.com/B5_SS.php